Accolades

Sunday, September 30, 2018

Imagine Clean

Hello All,

Today I am playing along with AAA Cards. The 'imagine' theme intrigued me and even more so when I got involved with the project. So, here is my card for today, enjoy.


At first, I was going with the word 'imagine' and the color scheme from the photo inspiration; no more or less; but then looking at the inspiration photo I realized what I was doing. I was imagining a cleaner world that comes with cleaner energy. 
Let me explain the method to my madness.
 Our past is full of 'old and outdated' energy. An excellent example of this is the light bulb!
Until very recently, the light bulb hasn't evolved a bit.
The wasted heat energy from the light was so hot you could set the house on fire.
So this is where my card comes into the picture. The bottom area of the card represents the outdated energy with its dirty sooty color surrounding its edges and under the sentiment. However, the swirl elements and the three enamel dots suggest signs of a cleaner future.
As you can probably guess the top of the card represents a future that is bright, crisp, and clean.
Okay, so realistically who on this cleaner earth would be a recipient of such a card?
Well, I don't think I need to explain the design process to the receiver. I think it would just be a nice card for well... Birthday, just because, hello, miss you... You get the point.  
Challenges Entered:


Okay, that should do it for me!! Thank you so much for stopping by and do appreciate you taking time out of your busy day to spend time with me. I hope you all have a fantastic day and lots of good crafting vibes headed your way.

Tuesday, September 25, 2018

Citrus Love

Hello All,

For today I am playing along with Fusion. Their challenge is an unusual one because instead of leaves, pumpkins, and cornucopias; we have citrus! To me, it seems like a summer challenge but of course, we are only two days into fall. I felt so cheery and smiled when I saw this photo inspiration. So, here we go, enjoy!


This card just makes me smile from ear to ear.
The stamp is from Peddlers Pack and colored it using Copic Ciao's.
The 'hello' sentiment was stenciled using acrylic paint in brown and then parchment colors.
I matted the image using light green CS and then 'not so fun' fun foam for dimension and then the card base in a darker green.
I wanted to mimic the leaves from the inspiration photo so I punched out a few leaves making sure they were a bit distressed. I also stacked the 'you' die-cut a few time for dimension. Plus, adding white enamel dots continues the dimensional look.
  Challenges Entered:
Fusion: Citrus


Okay, that should do it for me!! Thank you so much for stopping by and do appreciate you taking time out of your busy day to spend time with me. I hope you all have a fantastic day and lots of good crafting vibes headed your way.

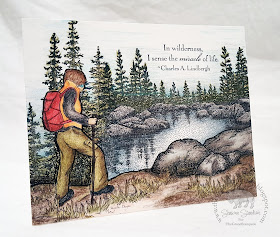
Hiker

Hello PINspirational Friends,

I am so happy to have you here today. We have a new challenge at PINspirational! But before I get to the challenge here is my card for today, enjoy!


This card is an example of digi stamp meets rubber stamp.
Our hiker and some of the foreground are digital,
 but the rest of the composition was hand-stamped.
______________________________


The sponsor is
Sheepski Designs

______________________________


The rubber stamping was stamped using black ink. I wasn't sure if Prismacolor pencils would highlight some of the trees and maybe some rocks. Well, the pencils worked beautifully! The waxy consistency allowed the color to sit on top of the ink. I was dumbfounded and overjoyed that it worked! 
A very fitting sentiment for the outdoors person in my life.
She might be reading this so I am not going to spill the beans.
My thought is that it would make a wonderful thank you card.
Challenges Entered:
SheepSki Designs: Facebook Challenge #28

Well, thank you again for taking time out of your busy day to visit my corner of the internet. I do hope you will join us at (PIN)spirational and play along. Until then take care and we will see you soon!

Monday, September 24, 2018

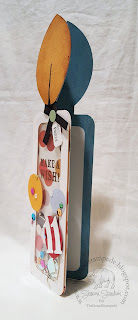
Birthday Candle Shaker

Hello Y'all,

It is Fall so I feel like I can say y'all for a few weeks. So, today I am throwing my hat into City Crafter Challenge. Their challenge was to create a shaker card with a birthday theme. Also, I am entering Seize the Birthday challenge. This challenge has some delectable toppings of 'die-cuts or punches'. Here we go, enjoy!
The pieces were cut using a Cricut and a cut file from The Cutting Cafe.
They have a massive assortment of cut files for all cutters and digital stamps. It is a bit difficult to get around the site but it is worth it. Fantastic products!
I have had this in my head for quite some time and am so glad that it finally came to fruition.
Above: The background is made up of Designer Paper and the 'make a wish' sentiment was stamped. Also, the little 'let's party' tag was stamped. All other elements were either cut using a Cricut or die-cut. Left/Below: This card is an adorable shaped card. I think my soon-to-be eleven year old will like it. Right/Bottom: A detailed shot of the shaker portion of the card. The balloons ties are DMC coated in glue, partially dried, and formed. The glue was tacky enough to stick nicely to the card base.


Challenges Entered:

Well, that should do it for me!! Thank you so much for stopping by and do appreciate you taking time out of your busy day to spend time with me. I hope you all have a fantastic day and lots of good crafting vibes headed your way. 

Inked Leaves

Hello Everyone,

I am posting this very late; for a school night anyway. Why? Because I was afraid to try a new technique. Now I'm done and am so happy with the results. Oh yeah, I am going to playing along with Twofer Card Challenge. Here are my cards, enjoy!


This technique is called Alcohol Lifting. It is very easy with fantastic results. Yupo paper and alcohol inks, and an alcohol lift ink pad are what you need to this project. Using your alcohol inks drip a few drops and let it spread and let dry. Ink up your stamp with the alcohol ink and stamp on the Yupo paper. The ink will be lifted and will remain on the stamp. Switch your paper to plain cardstock and stamp using the ink you lifted from the Yupo paper. Voila! 
 Here is my first card.
This is a partial section of Yupo paper and the leaf left behind from stamping with alcohol lifting ink. When dry wipe off the excess and it will come out nice and bright. I swear it is like magic! 
A simple vertical 'thanks' sentiment is all this card needed.
I saw this technique from an episode of Jennifer McGuire YouTube channel.
Click here for the episode!
________________________________

 Here is my second card.

This is the stamped image of the lifted ink from the first card.
The variegated colors on the plain white cardstock are amazingly beautiful.
I added an Autumn sentiment to correspond with the image.
A couple of splatters were added to move the eye around the card.
Again, the variations of color are so pretty.
Also, this is so simple to do! Why was I scared to try this new technique?
I don't know, probably because I thought it wouldn't turn out.
Well, it did turn out and I am loving the result!
Challenges Entered:
Twofer: Challenge #9- Leaves


Okay, that should do it for me!! Thank you so much for stopping by and do appreciate you taking time out of your busy day to spend time with me. I hope you all have a fantastic day and lots of good crafting vibes headed your way. 

Saturday, September 22, 2018

Pumpkin Flowers

Hello Y'all,

The twenty-third of this month marks the first day of fall! And I must say, Blogland in Cardland is blowing up with fall-inspired challenges. Well, I am here to say, sign me up! For today I will be playing along with Time Out Challenges, Creative with Stamps, and Freshly Made Sketches. That is a lot of challenges to pack into one card. Here we go, enjoy!


The bowl bouquet was partially stamped using Memento Espresso Ink.
I say partially because I masked off the bowl part of the bouquet (see below) and then free-handed the remaining pedals. I also added two leaves to the sides of the bouquet for balance.


Stampendous Bowl Bouquet cling mount


The pumpkin was drawn freehand and the entire image was colored using Prismacolor colored pencils. After all the coloring was finished I sponged Tattered Rose Distress Ink around the perimeter of the card. I also bumped up some of the line weights around the bouquet to coordinate with the pumpkin. The pumpkin needed some grounding so I scribbled in a shadow.
I am in love with fall colors!
I worked to make the shadows realistic. Not too bad considering I'm a novice.
They make me smile and I am sure the recipient will feel the same way. 
Out of all the design choices finding a sentiment and its correct placement was the most challenging. After tearing through practically all my word dies I settled on 'Hello Friend'. I die cut dark brown CS three times and stacked them together for a bit of lift.
Challenges Entered:
Freshly Made Sketches: FM559
Creative with Stamps: Challenge #30- Pumpkins
Time Out Challenges: Challenge #118


Well, that should do it for me!! Thank you so much for stopping by and do appreciate you taking time out of your busy day to spend time with me. I hope you all have a fantastic day and lots of good crafting vibes headed your way. 

Pumpkin Patch

Hello Again,

I have been busy in my craft room but not so busy blogging. As a result, I'm here playing catch up. For today I am playing along with Mod Squad Challenge Blog, Just Us GirlsCards in Envy, and Creative with Stamps. Here is my card for today, enjoy!


This card was stamped on watercolor paper using the
Pumpkin Background stamp from Peddlers Pack.
Tombow markers were applied directly on the stamp using various colors.
Then used an aqua pen to spread the color where I wanted it. 
The pumpkin panel is lifted off the checkered card base by dimensional foam. I also added a foam sentiment that is layered over dark brown cardstock. I offset the cardstock for yet, another layer of dimension.

Like the season, Fall is full texture and color which is what I wanted to convey on this card.

Stamping the same image multiple times proved to be a challenge for me that day.
Somehow the paper moved just a bit and I ended with a double image.
At first, I was understandability irritated but then I looked at it again and thought this is beautiful.
I continued stamping using the double image and went right in to blend the colors out.
When I was finished I moved the paper to its original spot and stamped it one last time using Expresso Brown Momento Ink. The image turned out clear and crisp with a dreamy watercolor feel. Perfect!
Challenges Entered:


As with most fall weather parents, we bundle up our little ones and send them off to the pumpkin patch with camera in tow ready for a fantastic fall day. However, upon arriving you come to realize you were not the only parent to the have this brilliant idea! So you wait in line for the hayride headed for the patch. You finally get there when it starts to drizzle. Kids are getting wet, tired, and cranky. At this point in the day, you would pick the first pumpkin you found but your kiddos soon realize they have a major choice choosing their pumpkin! Now that it has been drizzling for a bit the pumpkin patch is now a dirty place full of pumpkins caked with mud and you, not getting a single picture. I guess I didn't need a picture because these memories are precious, happy, and delightful to recall. I wouldn't take it back for all the pumpkins in the world.


Well, that should do it for me!! Thank you so much for stopping by and do appreciate you taking time out of your busy day to spend time with me. I hope you all have a fantastic day and lots of good crafting vibes headed your way.