Saturday, August 29, 2015

Beautiful Pond

Hello everyone,

For today I have a card that I am very proud to have created.  It consists of a collage of images (mostly Stampin' Up) that all relate to what you might find around a pond/lake.. Thanks to the creativity of Hand Stamped Sentiments for their photo inspiration and AAA cards for their masking theme it all turned out to be a wonderful card.. I hope you enjoy it just as much as I enjoyed making it..

Collage of images using the pond as the common theme.
Distress Markers is what was used to color the images
Detail
I grew up on a lake in the country which makes this card sentimental. While I was creating it my mind drifted back to my days on Lake Christann..  Mud between my toes while walking around the lake, watching the stars bundled up in my grandfathers gray coat, listening to all the sounds of nature will always have fond memories for me.

Entering Challenges:
AAA Cards: #46- Maskerade 
Hand Stamped Sentiments: Inspiration Challenge #219 (HHS 219)
SSS Wednesday Challenge: Anything Goes


How to:

  1. Stamped collage frames on heavy weight watercolor paper.
  2. Stamped pond/lake images using Post-It notes to mask the frames.
  3. Stamped dots 
  4. Colored images using Distress Markers and an aqua pen.
  5. Cut a mat a bit larger then the collage.
  6. Colored the edges using Distress Markers to create an ombre look. 
  7. Adhered the collage image to the ombre background.
  8. Matted the entire design on watercolor card base sized to be an A2 card.
That is it for me! I hope you have a great day and I want to thank you so much for stopping by and spending some time here at TheGrandStampede.  I would like to hear what you have to say good, great or otherwise..

All the best,
Shawna 

Friday, August 28, 2015

Just Sayin'

Hello All,

For today I have a simple and quick card to share. The Less is More challenge blog has a faboulous sketch challenge with endless possibilities.. So I took one last look at it and the light bulb went off. So here it is..


I had no idea how I was ever going to use this retired SU stamp.. It was free so couldn't say no.. The monochromatic design keeps the busyness of the rulers in check. It would make a great card for someone with a sense of humor; like my husband. I think we will appreciate it..

Entering Challenge:
Less is More: Week 238
Sketch #16
How to:
  1. Stamped SU ruler image on white card stock
  2. Colored the image using a monochromatic color scheme with Mexpy alcohol markers.
  3. Cut image at an angle per the sketch.
  4. Traced diagonal line from the image and stamped diagonal sentiment.
  5. Stamped 'Just Sayin'' once in black and then again with VersaMark Ink and heat set using white embossing powder.
  6. Colored the white embossed sentiment the same color as a ruler.
That was it.. I think it is a bit snarky and that is why I just love it!! Take all and leave a comment if you'd like.. 

All the Best,
Shawna 

Wednesday, August 26, 2015

Circle Card

Hello Again,

I should do more morning posts, I feel so accomplished.. Well I am still in my jams so maybe not so accomplished.

We are hanging on to the last strings of summer here in Michigan USA and I wanted to make a 'relax' card for Jo's Scrap Shack and Bunny Zoe's Crafts to commemorate these last days before school starts.

So for today I have created a circle card. I have never made a card that was not either a rectangle or square so I thought I would try my hand at making a circle card. Here it is.. Gulp! I hope you like it...

Relaxing scene using Distress Markers and Aqua Pen.
Cut a portion out of the back so it would stand.
Image was colored using Distress Markers and an aqua pen.
White sentiment was chosen not to distract from the focal image.
However, it does provide balance from the stamped image on top of the card.
Entering Challenges:

     Bunny Zoe's Crafts

I tried to color this image three different ways, Alcohol markers-too bold. PrismaColor pencils- too sketchy, Distress Markers with Aqua Pen- well that was just right. The scene is serene and full of watery color that adds to the calm.

How to:
  1. Stamped image in heavyweight watercolor paper.
  2. Colored image using Distress Markers and then blending them out with an aqua pen.
  3. Die cut image using a stitched circle die
  4. Die cut a larger circle for the card base.
  5. Die cut a second circle leaving some of the circle flat so it could stand. Then scored a line so the card would open from the back.
  6. Adhered the two larger circles together above the scored line to create my card.
  7. Stamped the top of a tree in light gray dye ink on the card base.
  8. Adhered the image to the card using dimensional adhesive.
  9. Die cut the sentiment and added it to the card.
There it is, my first shaped card.. Not bad for a first timer.. Well I have to start my day and get the kiddos going.. Don't forget to leave a comment good, great, or otherwise. Thank you so much for stopping by spending time with me. Have a great day and we will see you soon! 

All the best,
Shawna 

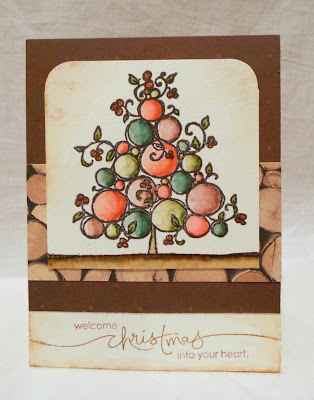
Color Tree

Good Morning All!

I usually write my posts ridiculously late at night. So I thought I would try to post in the morning with wide eyes (well wide'ish) and a cup of tea.  

For today I have a card that was inspired by DRS Designs color challenge and Just Us Girls photo challenge. The other day I saw a Christmas countdown ticker and it showed something like 123 days til December 25.  There is still plenty of time and good times to be had but I know it will go by in a blink of an eye. Well here is my take on the challenges.

The circles from the correspond with the patterned paper
in the background.
Very pretty color combination.
Detail showing the watercolor detail of the tree.
This tree is directed more towards Christmas but it can be used for any season. Color the berries green for spring buds, use fall colors for the circles. I think you will see this tree again in this spring or maybe earlier. 

Entering the following Challenges:

       Simon Wednesday Challenge Blog

How to:
  1. Stamped tree image on heavyweight watercolor paper,
  2. Colored image using Distress Markers to match both challenge themes.
  3. Trimmed image and rounded corners. 
  4. Lightly distressed the edges. Set aside.
  5. Cut and scored vanilla CS to an A2 size card.
  6. Stamped sentiment on watercolor paper the same size as the card base then added it to the card base and lightly distressed the edges.
  7. Adhered SU PP to the base then added another strip of SU PP. 
  8. Added tree image to the base.
That is all for me! Thank you so much for stopping by and sharing part of your day with me.. I look forward to your comments good, great or otherwise.. Take care all and have a great day. 

All the best,
Shawna 

Monday, August 24, 2015

Witches Brew

With Fall right around the corner it is time to start creating Halloween cards... They are so much fun to make and this card would be no exception.. The inspiration came from the Color Throwdown color palette (see below). Before you see the challenge I would like to show you my card.. I hope you like it.

With Halloween on the brain I thought this design
would be perfect for the witches brew!
Sentiment was done using Perfect Pearls.
Embossing powder I think would have been too bright and powerful.

Below are a couple of details pictures of the magic flame.


For some reason my camera does not like black cards.. These colors are a lot more vivid in real life... (Updated Pictures with truer color) This past weekend we went camping and had the opportunity to have 'magic' fire.. Well not really magic it is a powder you place in your campfire and it turns all sorts of different colors.. It captivates both kids and adults alike.  This is what inspired this card... A bit of magic fire to start the Halloween season..

Challenges Entering:
Color Throwdown: CTD356


How to:

  1. Cut and scored my CS to an A2 size card. Set aside
  2. Cut black CS the same size as the base.
  3. Traced the stencil in select places
  4. Colored and shaded the 'flames' orange and green.
  5. Taped down the stencil on my black card base.
  6. Fussy cut each piece of flame and laid it down on the appropraite spot on the stencil.
  7. Added sentiment using Perfect Pearls. 
The stencil I used for the flames.
That is it for me tonight.. I hope you enjoyed your stay and I want to thank you so much for taking time out of your busy day to visit me.. If you want to leave a comment please do; I really enjoy what you have to say good, great, or otherwise.. Take care and see you soon.

All the best,
Shawna 

Simply Pretty

Hello Everyone,

For today I am going to enter in the Less is More sketch challenge.  CAS cards as easy as they MAY seem are very difficult to create.. I have been working on CAS cards throughout the year.. Well here it is I hope you like it...

Sentiment pops off the white paper.
I guess I should never underestimate how such
pretty paper can be so pretty and detailed and still remain CAS.

So I was looking through all my PP the other day and discovered this gem... I completely forgot I bought it but I am so glad we were reintroduced. It is very graphic and somewhat detailed in its design but I think it does work as a CAS card. Why? The pattern is big and bold with minimal colors. I just love the way this turned out..

Entering Challenge: Less is More
Week 268; Sketch 16
How to:

  1. Found amazing PP from my stash..
  2. Cut and scored my CS to an A2 size card base.
  3. Cut PP at an angle then adhered it to the card base.
  4. Die cut 'birthday' sentiment then adhered it to the card base.
That was it.. Again easy peasy but actually very difficult keeping it so simple.. Late night again, yes Petra it is turning into a habit, so I should turn it in for the night.. One more post and I am seeing the inside of my eyelids. If you could leave a comment and let me know am I headed in the right direction with CAS design? Or should I go back to the drawing board.. Thank you for stopping by and we will see you sooner then later. 

All the best,
Shawna

Friday, August 21, 2015

Hummingbird Wishes

Hello Everyone,

For today I have a card that has been in my head for the better part of 3 years.. But it seems that now is a good time to put the idea into reality. Well here we are I hope you like it..

I used a cover plate from Papertrey Ink.
I have used this on various other projects.
Patterned paper was sponged with a bit of Tumbled
Glass Distress Ink to comply with Sunday Stamps
Color Challenge.
Humming bird is from Gina K. Deisgns. The flower was
cut out from the same PP as the background.
Entering Challenges:

  Our Logo   

Oh what a great feeling to get an idea out of your head! These colors reminded me of a summer garden in full bloom on a hazy summer day. No garden isn't complete without a hummingbird in its midst. The lattice cover plate is a perfect addition to creating a kind of 'fenced' in area. All and all I think this card is a success.

How to:

  1. Cut and scored CS to an A2 size card. Set aside.
  2. Sponged PP using Tumbled Glass Distress Ink.
  3. Trimmed down PP and adhered it to the card base.
  4. Die cut lattice cover plate and added it to the floral base.
  5. Fussy cut a larger flower out of the same PP. Added it to the card.
  6. Stamped the hummingbird image on a seperate piece of CS
  7. Colored the bird using Prismacolor pencils.
  8. Die cut the bird image with a stitched circular die. Adhered it to the card
  9. Sponged the corner of the bird die cut using colors Tumbled Glass and Pistachio by Memento. 
  10. Die cut 'wishing' sentiment and lightly sponged the bottom.
  11. Stamped the rest of the sentiment using VersaMark Ink then heat set in white on a scrap piece of black CS and added it to the card.
With fall just around the corner it is nice to create summer cards. Thank you so much for stopping by and spending time with me. I really like to hear what you have to say so leave a comment if you'd like. Thank you again and take care!

All the best,
Shawna 


Warm Thoughts

Hello All,

I had to break down and start creating winter cards.. I have caved into peer pressure with all of these other beautiful winter cards coming out.. So here I am on gladly on the band wagon!

I decided not to add a line for the hills that leads to the trees.
To me it looks hazy like blowing snow.
Leaving it line-less seemed like a good idea.
Shimmery hood and glove trim adds just a bit of sparkle.
A single button with a bow is all the embellishment this
card needs 
This card was designed for the for Brown Sugar Challenge Blog.. The theme this week is 'buttons and bows'. Stop on over and see what the team did as well. You will not be disappointed.


 Also I wanted to introduce Sami Stamps as our sponsor this week.. Their line drawings are just fantastic. Very versatile and easy to work with in any computer program. So hop on over and check it out. You will love what you see...


I envisioned this woman around a warming cabin which provides a cup of hot joe. The trees in the background would indicate she might have been looking for a Christmas tree..

I love everything about this card. The color is mostly white with a pop of color and sparkle.. Winter is supposed to sparse and white and full of quiet moments like the lady sipping her coffee.    

Here are some other challenges I am linking to:
HLS August Christmas Challenge: Theme- Sparkle
Holly Jolly Christmas Challenge: #54- Snowflakes and Sparkle
Weekly Christmas Card Challenge: #38- Anything Goes (SCCC)
ABC Christmas Challenge- Q is for Quantum

ABC Christmas Challenge
I am using 'F' and 'G'
  Our Badge  
How to:
  1. Cut and scored my CS to an A2 size card base.
  2. Dry embossed the card base twice using the retired SU snowflake embossing folder.
  3. Printed out my image from Sami Stamps on 110lb. CS
  4. Colored her using my Mexpy alcohol markers.
  5. Stamped the sentiment using a set from Simon Says Stamp 
  6. Created a mask for the tree line then stamped the tree image using silver pigment ink.
  7. Die cut the image traced the die cut image to a piece of chevron PP.
  8. Cut just outside the line creating a border. 
  9. Embellished the card with a snowflake button and bow 
  10. Adhered the entire design to the card base. 
Well that is it for me!! I hope you enjoyed your stay and hope you liked what you saw. Thank you so much for stopping by and if you are so inclined please leave a comment.. I love to hear what you have to say. Take care everyone and we will see you soon!

All the best,
Shawna 

Wednesday, August 19, 2015

School Days

Hello Friends,

School is back!! Looking forward to another academic year, new friends, new teachers, expanded knowledge and silence (Did I just say that? Why yes I did!!). Don't get me wrong I love my children to pieces but we are all getting under each others skin.. We have done all the day camps, outings, camping, and family visits that one Mom can handle.. You can hang me out to dry because by this time in the Summer I am fresh out of ideas..

So many blogs are having school themed challenges and I am SO jumping on that band wagon!! I am packing a one, two, three punch with this card.. I am sending it to (PIN)spirational, CAS Colours and Sketches, Simon Says Stamp Wednesday Blog and Addicted to CAS! Here it is I hope you like it..

Plays along with the CAS sketch. (PIN)spirational inspired
the chalkboard background with the black backdrop from the photo.
Very graphic and simple to replicate.
'teacher' is die cut 3x and sandwiched together for
just a bit of dimension.
The 'chalkboard' look follows the school theme. Embossed
black cardstock and rubbed with a white crayon.
Couldn't be simpler.
Entering these challenges:
CAS Colours & Sketches: Challenge #137- Sketch
Addicted to CAS: Challenge #70- Code Word: School
(PIN)spirational: Challenge #147- Photo
Simon Says Stamp Wednesday Challenge Blog- Back to School

      https://www.pinterest.com/pin/141581982012361671/   Simon Says Stamp Wednesday Challenge Blog

How to:
  1. Cut and scored white CS to size A2 card. Set aside.
  2. Cut black CS the same size as the card base (A2)
  3. Dry Embossed the black cardstock then rubbed a white crayon over the image and applied it to the card.
  4. Die cut a star shape out of PP.
  5. Die cut 'teacher' 3x and sandwiched them together.
  6. Cut out bingo card from more PP.
  7. Arranged the elements on the black 'chalkboard.
That was it!! So easy and simple to do.. Well it is 1:30 A.M. and I should turn in for the night. Thank you so much for checking in and seeing what I have been up to.. Any comments good, great, or otherwise are always welcomed.  It really means a lot to know that you are there and listening.. Take care and until next time.

All the Best,
Shawna 
Related Posts Plugin for WordPress, Blogger...

Labels

(PIN)spirational (76) 4 Crafty Chicks (1) A Day For Daisies (3) AAA Birthday (6) AAA Cards (50) AAA Colourful (1) ABC Christmas Challenge (1) Addicted to CAS (41) Addicted to Stamps (2) Addicted to Stamps and More (31) All Dressed Up Challenge (1) Allsorts Challenge (4) Alphabet Challenge (2) Always Playing with Paper (11) Animal Friends Challenge (3) As You See It (12) Brown Sugar Challenge (12) CanYouCaseIt Challenge (1) Cards in Envy (21) Cardz4Galz (2) Cardz4Guys (12) CAS Colours & Sketches (26) CAS Mix Up (1) CAS on Fridays (8) CAS on Sunday (5) CAS Stencil Challenge (1) CAS Watercolour Card Challenge (12) CAS-ology (54) CAS-ual Fridays (4) CAS(E) this Sketch (90) CASEing Christmas (1) casology (1) Challenge Up Your Life (6) Christmas Card Challenge Blog (2) Christmas Card Throwdown (1) City Crafter Challenge Blog (37) Color Hues (8) Color INKspiration (2) Color My Heart Color Dare (42) Colour Q (26) Come and Get It Challenge (3) Craft Stamper Challenge (2) Crafty Cardmakers (2) Crafty Creations (1) Crafty Gals Corner (10) Crafty Hazelnut's Christmas Challenge (1) Create with Connie and Mary (8) Creative Inspirations (2) Creative Knockouts (5) Creative with Stamps (46) Cupcake Inspirations (28) Curtain Call (18) Daisy Chain Challenges (2) Daring Cardmakers (2) Day of the Month Card Club (4) Design Team (294) Double D Challenges (42) DRS Designs (4) Fab Friday (5) Fab n' Funky (2) Fantasy Stampers (1) Festive Friday (3) Freshly Made Sketches (125) Friday MashUp! (3) Fusion (33) Gina K. Designs (1) Global Design Project (3) Guest Designer (42) Hand Stamped Sentiments (18) Happy Little Stamper- Anything Goes with Dies (1) Happy Little Stamper- CAS (3) Happy Little Stamper- Christmas (4) Happy Little Stamper- Mixed Media (1) Happy Little Stamper- Sketch (1) HLS Christmas Challenge (1) Holly Jolly Christmas (1) House of Cards (49) If You Give a Crafter a Cookie (6) IN(K)SPIRE_me (5) Inkspirational (50) Inspire.Create.Challenge (1) Inspired by All The Little Things (10) Inspired By... (11) Jingle Bells (1) Joy of Sets Tic-Tac-Toe Challenge (1) Just Add Ink (14) Just Us Girls (59) Less is More (23) Let's Squash It! (1) Little Tangles Challenge (4) Make It Monday (2) Make My Monday (61) MarkerPOP! (1) Match this Sketch (1) Merry Monday Challenge Blog (2) MHK Designs (114) Miscellaneous (3) Mix It Up (1) Mod Squad Challenge (12) MoJo Monday (1) My Time to Craft! (6) Naughty or Nice Challenge (3) NBUS (7) One Layer Christmas Card Challenge (2) Paper Craft Crew Challenges (7) Paper Pals Arts (2) Papercraft Challenge (4) Pattie's Creations Design (3) Pause Dream Enjoy Challenges (1) PolkaDoodles Challenge (1) Rainbow Card Challenge (6) Retro Rubber Challenge (21) Retro Sketches (4) Rubber Dance Blog (1) Runway Inspired Challenge (2) Seize the Birthday (9) Sentimental Sundays (1) SheepSki Designs (1) shopping (1) Shopping Our Stash (15) Simon Says Stamp Monday Challenge (5) Simon Says Stamp Wednesday Challenge (6) Simon Says Stamp Work it Wednesday Challenge (1) Sister Act (1) Sketch Saturday (13) Society of Stampholics (3) Sparkle and Shine (3) SSS Wednesday (10) Stampin' Royalty (2) Stamping Sensations (7) StampInkPaper (5) STAMPlorations-Theme & Sketch (3) StampPeddler (26) Sunday Stamps (48) Sweet Stampin (4) Technique Tuesday (1) TGIF Challenges (3) The Card Concept (36) The Challenge (4) The Color Throwdown (120) The Crafty Addicts (1) The Flower Challenge (15) The House That Stamps Built (1) The Library Challenge (4) The Male Room (90) The Merry Christmas Challenge (2) The Paper Craft Crew (1) The Paper Players (121) The Sisterhood of Crafters (2) Tic Tac Toe Challenge (4) Time Out Challenge (26) Try Stamping on Tuesday (2) Tuesday Morning Sketches (1) Tuesday Throwdown (11) tutorial (1) Twofer Challenge (14) Virginia's View Challenge (5) Waffle Flower (1) Watercooler Wednesday Challenge (12) Wednesdays Creative Inspirations (4) Weekly Christmas Challenge (1) Your Next Step (1)