Friday, August 7, 2015

Hello Autumn!!

Here in Michigan we are approaching my favorite season, Autumn.  The air will soon be crisp and cool not so 'Gatsby' hot**. In the late summertime I long for school to start and get some routine back, pro football to start (go Bills!), and start cooking good ole' fashioned comfort food. Right now I am in a holding pattern but the clouds are starting change and all the 'back to school' stuff is out in stores. It is starting to change and I can hardly wait..

yada, yada, yada!! Here is my card for today full of Autumn's delights. Enjoy!

A simple 'hi' is what she might say at the pumpkin patch
Layers of colorful leaves make for a beautiful backdrop for our girl.
Detail of the pumpkins showing shading and vibrant color.
Detail showing our sweet girl by My Besties Digi & Rubber Stamps
This card is for Brown Sugar Challenge Blog with a theme of 'Anything Goes'. So enjoy and have it; create to your heart's desire..... well.... ANYTHING!

Grab Our Badge
Challenge #158: Anything Goes
Isn't she adorable! I hope will provide some inspiration and prompt you to join us at Brown Sugar Challenge Blog

How to:
  1. Cut and scored white CS to 4.5" x 6". Set aside.
  2. Finding my image on the computer and changed her eyes to a very deep green and printed two images out.
  3. Cut my print slightly smaller then the card base.
  4. Stamped the leaf background using dark pinks, green, yellow, and rust.
  5. Sponged the panel with Distress Ink using 'broken china' and 'chipped sapphire' around the top perimeter of the panel.
  6. Colored the image of the girl as shown using PrismaColor pencils.
  7. Shaded and drew an outline of the girl to make the image pop just a bit more.
  8. Punched the bottom of the panel.
  9. Stamped sentiment then die-cut using a circle stitch die. Set aside
  10. Die-cut flourishes for the pumpkin patch and attached it to the colored panel.
  11. Stamped three pumpkin image and colored then shaded using PrismaColor pencils.
  12. Fussy cut the pumpkins and added them with the flourishes then 
  13. Attached the sentiment with dimensional adhesive. 
  14. Adhered the colored to a maroon panel and the whole design on the card base.
That's a wrap for me!! I am going to bed and get my beauty sleep or just sleep, whatever. Thank you so much for stopping by and sharing your day with me.. Please if you'd like to leave a comment that would be great!! It makes my day a bit brighter.. Until next time take care!

All the best,
Shawna


**You all know the scene when Daisy, Gatsby, and Tom are at the hotel room in NYC and it is so stifling hot they can hardly stand it, yes, Gatsby hot.

Thursday, August 6, 2015

Silk Screen Feather

Hello Everyone!

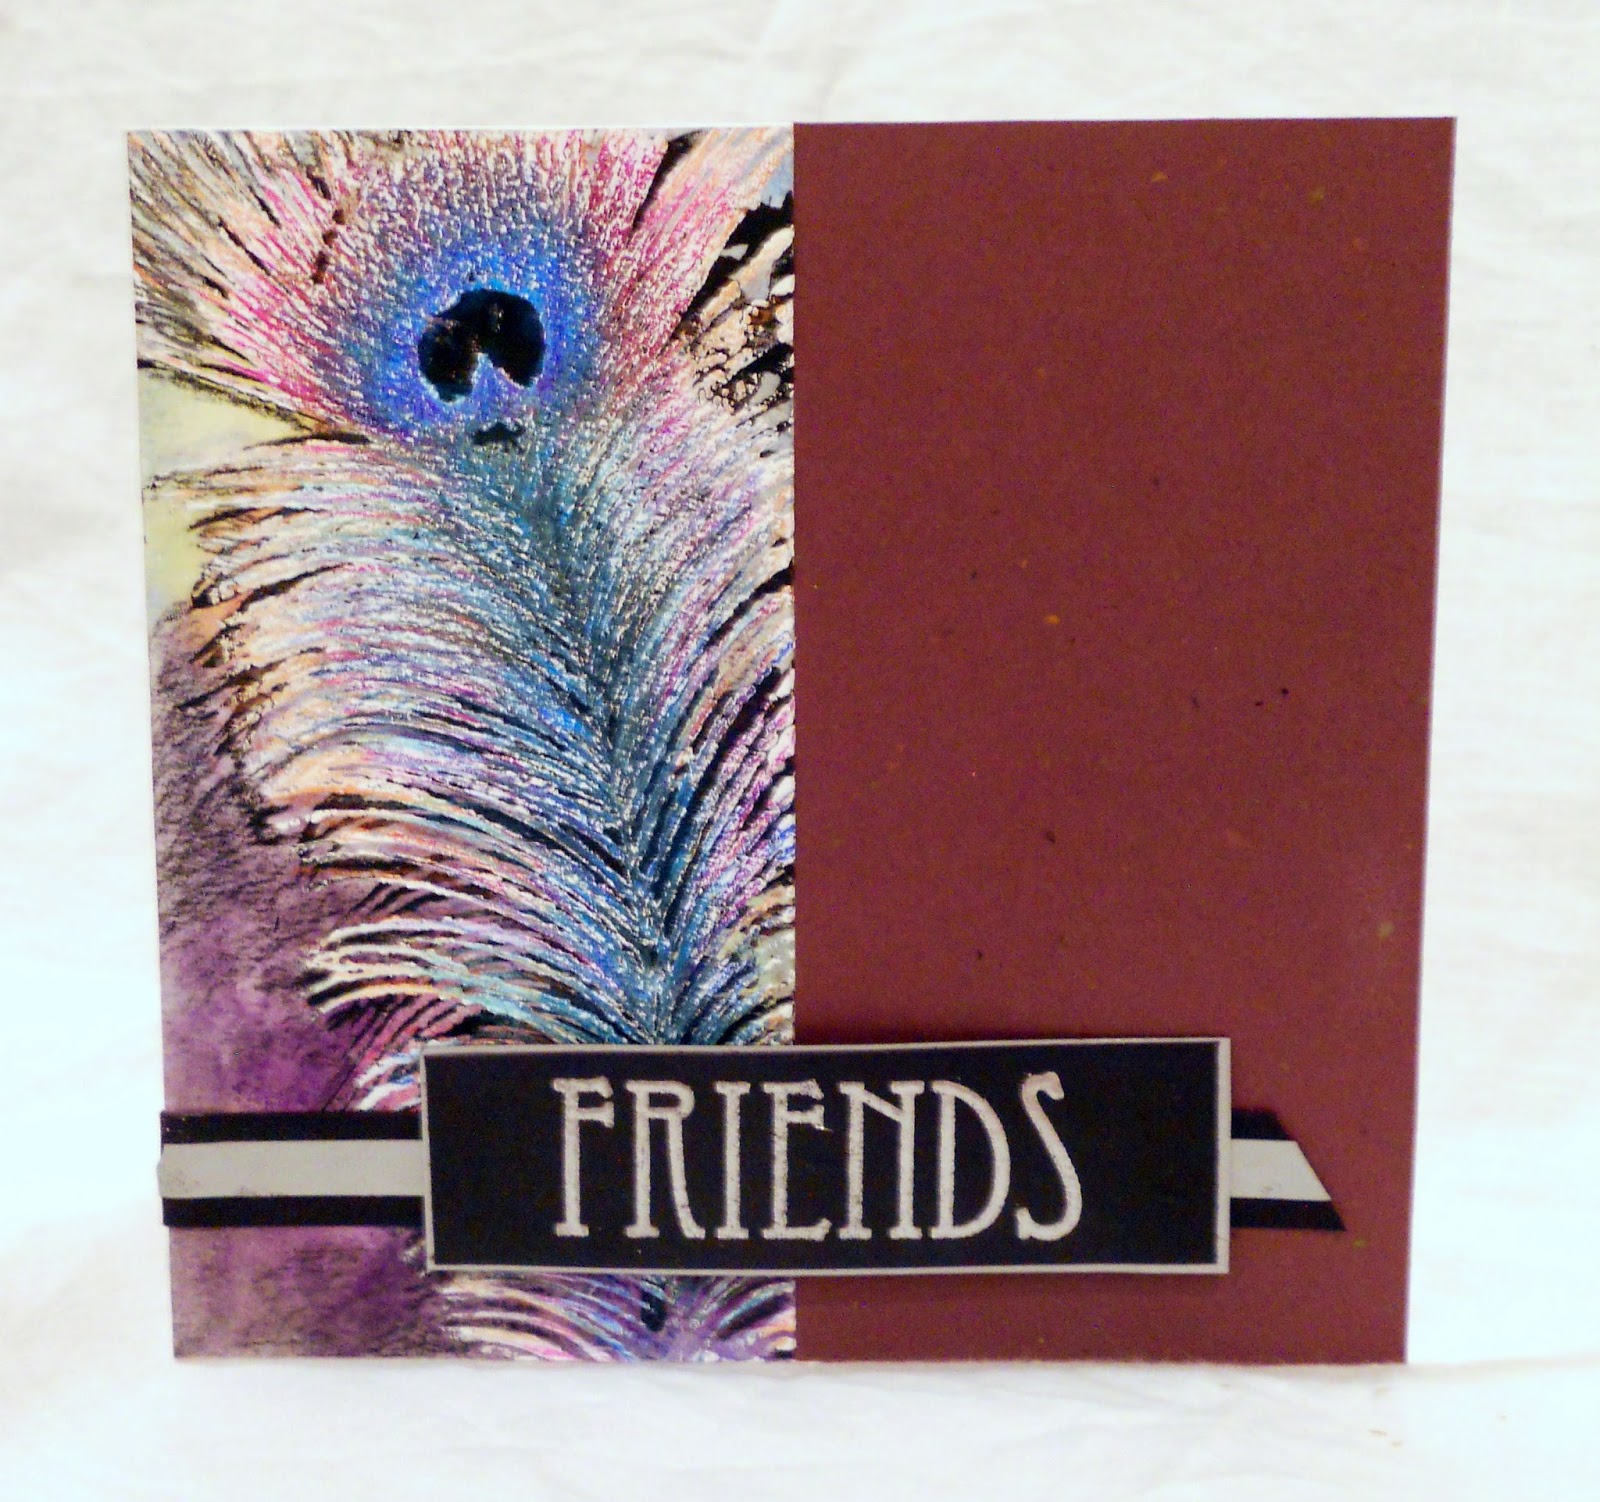
The card for today has become one of my favorites of all time! The color of the feather is a bit different for a traditional peacock feather and the background is a bit dreamy. This resulted in a surprising and interesting outcome; the feather reminds me of a negative photograph. Do you agree? Maybe, anyway Enjoy!

This is a silk screen peacock feather using white acrylic paint.
then colored using colored pencils.
Dull silver embossing doesn't out stage
the focal peacock image.
Watercolored background with a silkscreen
peacock feather then colored using PrismaColor pencils.
I know a lot of crafters have this issue too but I couldn't quite get
the shimmer from metallic colored pencils
Even though the colors are off from a real peacock feather I still really enjoy the colors of this card. The blank panel on the reverse side needed to be a solid color and keep the feather a focal point. The black banner and dull silver banner are also understated. Thanks to Crazy 4 Challenges for the sketch inspiration and of course Sister Act for letting me participate!!

Sending card to:
Crazy 4 Challenges - C4C295
Our Logo
Anything Goes at Sister Act
Challenge #117
Color, color, color that is what this card is all about. I sometimes have to remind myself you don't to stamp images all the time. There are other ways such as silk screening! This silkscreen is from Martha Stewart and am so glad to have it in my stash. So here is how I did it.

How to:

  1. Cut my white card base to 6" x 4" and set aside.
  2. Painted the background of the peacock panel using basic watercolor.
  3. Silkscreen a black feather image using standard acrylic paint and let dry.
  4. Repeated step 3 but used white.
  5. Colored the feather using PrismaColor pencils.
  6. Layered color over color for more dimension.
  7. Created the banner with dull silver and black paper.
  8. Sentiment from black CS outlined with the same dull silver paper.
  9. Stamped sentiments using VersaMark Ink and then heat set using silver embossing powder.
  10. Cut and placed a piece of maroon CS to CS base per the sketch provided.
  11. Added the peacock panel to CS base.
  12. Adhered the banner and sentiment to card.
That should be it for me.. Thank you so much for stopping by and taking time out of your busy day to visit me.. Please leave a comment if you'd like!! Take care and see you soon!

All the best,
Shawna 

Wednesday, August 5, 2015

Autumn color

Hello everyone,

Autumn is coming up and couldn't be more excited to see the hot summer give way to cool, crisp fall!! So for today I have a card going to Just Us Girls with the word prompt 'Autumn'. How could you go wrong!! Here is my card I hope you enjoy it.

Layers of Autumn color and leaving a lot of white too..

This card came from a sketch I kept for about a year. It is just now that I implemented it. The leaves all stamped in fall color and fussy cut. The grungy dots in the background gives it texture as does the twine. The sentiment says it all.. I love fall colors!! I am just aching to rid myself of HOT! I know, I know don't wish your life away so I guess I should count my blessings; one of them being air conditioning!

Entering challenge:
Just Us Girls #304: Autumn
Well this post will short sweet and to the point I am just tired and I wanna go to bed (get it). Take care all and I want to thank you so much for stopping by and please don't forget to leave a comment good, great or otherwise. Hearing what you have to say just makes my day good day a bit better.

All the best,
Shawna 

Tuesday, August 4, 2015

Extended Scene Part II

Hello everyone,
Today I am playing along with DRS Designs. I just recently received some of their stamps and am really enjoying them! Their theme is 'Make a Scene' so I decided to take my DRS stamps and get to work..well sort of, I will explain below. Here is my card I hope you like it..

Extended the mosaic feel outside of the colored area.
Sentiment and dragonfly came from another project
and it wasn't usable until now.
Detailed image of the mosaic flowers
My eyes started cross while trying to decipher which was what
but in the end it all worked out beautifully.
Sentiment gives the card a bit of sparkle.
The layout of this card is reminiscent to another one did for House of Cards. If you'd like click here to see the post.

I actually created this flower scene when I first received the stamp but wasn't sure how I was going to use it, until now. Yeah! The dragonfly might look familiar too, it is from a previous post. I added wrong embossing powder and had to redo the sentiment but kept this one for another time. The ribbon was actually bright pink and looked terrible against the coral flowers. So I colored the ribbon with the lightest yellow alcohol marker I had. The color afterward looked much better!

More Rubber Stamp Fun at our Website!
Entering: Game #185
Cause a Scene
How to:
  1. Cut and scored my kraft CS to an A2 sized card.
  2. Stenciled the kraft paper using VersaMark Ink as a watermark
  3. Stamped the flower image on kraft paper in black. Set aside.
Mosaic flower image was completed several weeks ago:
  1. Stamped the mosiac image from DRS Designs and then stamped the flowered image. 
  2. Colored the flowers using different shades of the same color. Repeated with the green background.
  3. Cropped image.
  4. Let the design sit. Staring back at me begging me to use it!! LOL...
Now back to the present:
  1. Adhered the flower mosaic image to the card base using dimensional adhesive. 
  2. Cut a piece of ribbon and colored it using a very light yellow alcohol marker to achieve the correct color.
  3. Wrapped the card and tied the bow.
  4. Added the sentiment with dragonfly.
Okay for real this time it is time for me to go and get my day going.. Thank you for stopping by and please leave a comment if you'd like. Hearing what you have to say is such a joy.. Take care all and see you soon.

All the Best,
Shawna

Cycling Then & Now

Hello Everyone,

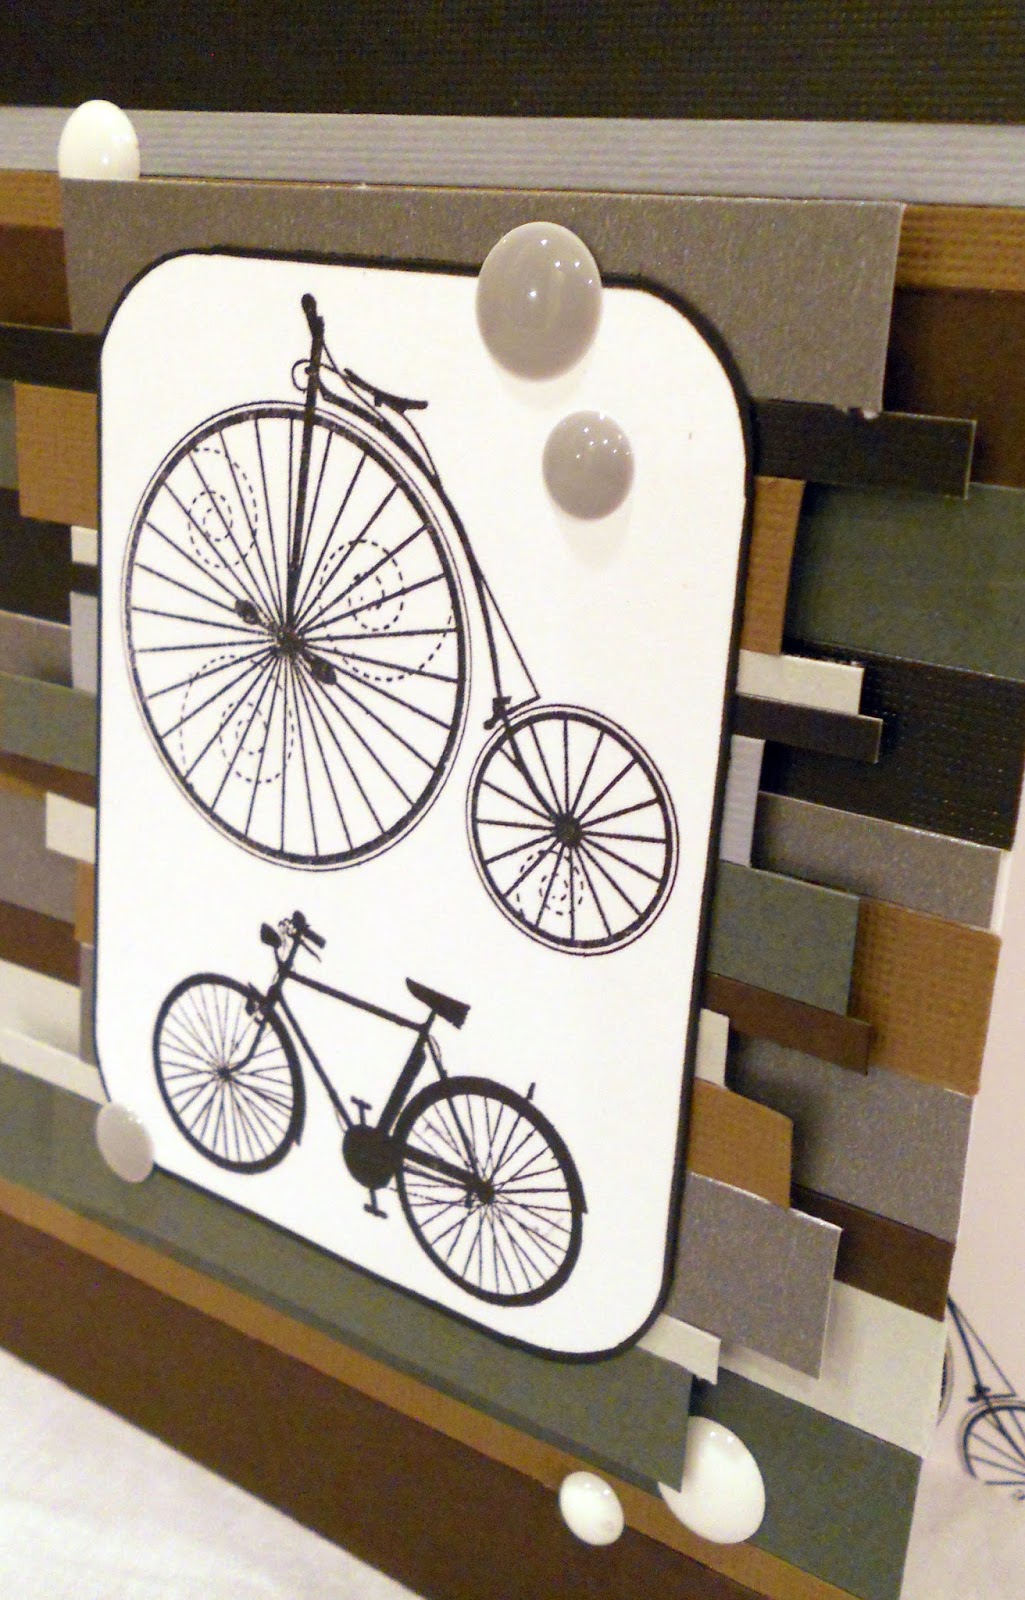
Today I am going to share with you a card that I made for The Male Room and Sunday Stamps. I have been pondering on fusing these two challenges together for quite sometime when this morning at 4:00am I woke up and got it!! Ran down to my craft area and went to work.. And this was the result I hope you like the card.


Here I am representing the Sunday Stamps sketch using the wheels
as my four circles.
This monochromatic and horizontal design
is sleek modern with an antique flair.
Detail showing the planks that frame the bicycles
This adds interest without being too distracting to the overall design.
Enamel dots were added for interesting and keeping the eye engaged.
White dots are under the plank frame
while the gray dots are on the bicycle images.
I thought a sentiment on the face of the card would be too much
So I created a similar scene inside with the sentiment.
Entering Challenges:
The Male Room: Spots & Stripes (TMR#15-15)
Sunday Stamps: SSC106 - Getting Sketchy


This design is a great way to use up some scraps. Each strip of paper is placed using various widths and I think it worked out well; especially the popped up plank frame! This is a unique detail and especially masculine.  Some of the stripes of paper are metallic gray for just a bit of shine. The dots are in groups of three of gray and white that is in keeping with the spots 'n' stripes theme.

Okay here is the How To:

  1. Cut and scored white CS base to size A2.
  2. Gathered CS scraps of grays, browns, and black then cut them in strips in various widths.
  3. Arranged the strips of paper as shown then cut off any excess.
  4. Cut another sheet of small scrap CS and repeated step 3 except not cleaning up the edges.
  5. Stamped bicycles cut to fit then rounded the corners and outlined in black. Placed it on the plank panel.
  6. Attached the plank panel using dimensional adhesive.
  7. Added enamel dots.
  8. Repeated theme for the inside of the card.
Well that is it for me.. I want to thank you so much for stopping by and please leave a comment, I like to hear what you have to say.. Take care and have a great day!

All the best, 
Shawna 

Monday, August 3, 2015

Snow Business

Hello Everyone,
For today I am playing with (PIN)spirational challenge. Yes, I think it may be time to be thinking about......Christmas!! Here is my first card of the Christmas season. I hope you y'all enjoy it.

Background was made using the shaving cream technique.

Snowflake is very dimensional with a layer of white, a layer of vellum
and another snowflake in the center.

Perfect sentiment for a winter card.

Showing the inside panel of the card.
**The inside panel of the card shows the detail of the various die cuts used. First, die cut a square on the card base. Then using Spellbinders 'Fleur De Lis Squares' die cut the image and attached it to the card base. This is what creates the open space on the card. Die cut a smaller square of shaving cream paper and added the 'lattice' die from Stampin' Up. Lastly, I punched out the snowflakes. I am not going to lie, it was a lot of work but I think the result is wonderful. Below you will see a picture that shows the shadows of the open spaces on the card.

Detail showing shadows created by the open spaces
on the card.
The majority of this card was done about a year and half ago but I had to stop because I didn't know what to do with it. So it sat, sat, sat by my craft table FOREVER. It was not until this (PIN)spirational challenge when the light bulb went off in my head.. DING! Looked over and saw my neglected card just waiting for an identity.

https://www.pinterest.com/pin/141581982012353809/
{PIN}spirational Challenge #145 
How to: 
  1. Applied the shaving cream techinque to a piece of white CS.
  2. Cut another piece of white CS into a square shape. 
  3. Used all the steps from above paragraph **
  4. Stamped the sentiment and cut into a banner.
Well that is it for me tonight! I hope this post finds you well and not too stressed out about Christmas. Take care and please leave a comment if you'd like.. Thanks for stopping by and we will see you soon. 

All the best,
Shawna 

Saturday, August 1, 2015

Dragonfly Delight

Hello everyone,

For today I am posting my August inspiration card for the House of Cards.  The theme this month is metallic. Oh the possibilities are endless and am so excited to see what everyone designs. I hope my card will jump start your creativity.. Enjoy!
Copper embossing powder running down the card
elegantly matches the copper sentiment.
Metallic finishes changes as you move the card around
which can give the entire design a new look.
Dragonfly popping off the panel adds a
beautiful design element to the card
This card was inspired by a very special place here in town called Fredrik Meijer Gardens or Meijer Gardens for short.  Click here to find out more. Meijer is a regional grocery store chain that is headquartered here in Michigan.  As a result, of amazing philanthropy from the Meijer family and generous donations we have world class gardens and sculpture park right here in Grand Rapids Michigan! 

One sculpture caught my eye right by the main entrance. It is a weathered patina sculpture (I will get a pic soon). The effect was runny, rusty and green. It was beautiful and completely inspired me to create this card. The color combination is soothing and yet very dynamic. The dragonfly panel also gives a sense of movement and acts as a subtle focal point. The dragonfly coming off the panel gives your eye a place to rest and view the sentiment with the same copper embossing. To keep your eye engaged a dark brown frame anchors the entire composition.  I really am liked how this turned out and hope you do too.

How to:
  1. Cut and scored kraft CS to A2 size. Set aside.
  2. Cut another kraft panel then dragged VersaMark Ink down the panel and then heat set using copper embossing powder. 
  3. Sponged green ink up the panel leaving some of the kraft paper exposed.
  4. Mounted the copper panel to the dark brown CS then to the kraft CS base.
  5. Cut the panel for the dragonflies, stamped them at different angles and distressed the edges.
  6. Added the dragonfly panel to copper base.
  7. Stamped dragonfly on a separate sheet of kraft paper.
  8. Stamped the sentiment using the same method as step 2.
  9. Fussy cut around the sentiment and dragonfly leaving a bit for the end of the card. Adhered to card.

Well that is it for me today! I hope I have sparked some inspiration and will prompt you to join us!! I want to thank you so much for stopping by and taking time out of your busy day for me. If you'd like to leave a comment good, great or otherwise that would be great. Your comments inspire me to be more creative everyday. Thank you again!

All the best,
Shawna
Related Posts Plugin for WordPress, Blogger...

Labels

(PIN)spirational (76) 4 Crafty Chicks (1) A Day For Daisies (3) AAA Birthday (6) AAA Cards (50) AAA Colourful (1) ABC Christmas Challenge (1) Addicted to CAS (41) Addicted to Stamps (2) Addicted to Stamps and More (31) All Dressed Up Challenge (1) Allsorts Challenge (4) Alphabet Challenge (2) Always Playing with Paper (11) Animal Friends Challenge (3) As You See It (12) Brown Sugar Challenge (12) CanYouCaseIt Challenge (1) Cards in Envy (21) Cardz4Galz (2) Cardz4Guys (12) CAS Colours & Sketches (26) CAS Mix Up (1) CAS on Fridays (8) CAS on Sunday (5) CAS Stencil Challenge (1) CAS Watercolour Card Challenge (12) CAS-ology (54) CAS-ual Fridays (4) CAS(E) this Sketch (90) CASEing Christmas (1) casology (1) Challenge Up Your Life (6) Christmas Card Challenge Blog (2) Christmas Card Throwdown (1) City Crafter Challenge Blog (37) Color Hues (8) Color INKspiration (2) Color My Heart Color Dare (42) Colour Q (26) Come and Get It Challenge (3) Craft Stamper Challenge (2) Crafty Cardmakers (2) Crafty Creations (1) Crafty Gals Corner (10) Crafty Hazelnut's Christmas Challenge (1) Create with Connie and Mary (8) Creative Inspirations (2) Creative Knockouts (5) Creative with Stamps (46) Cupcake Inspirations (28) Curtain Call (18) Daisy Chain Challenges (2) Daring Cardmakers (2) Day of the Month Card Club (4) Design Team (294) Double D Challenges (42) DRS Designs (4) Fab Friday (5) Fab n' Funky (2) Fantasy Stampers (1) Festive Friday (3) Freshly Made Sketches (125) Friday MashUp! (3) Fusion (33) Gina K. Designs (1) Global Design Project (3) Guest Designer (42) Hand Stamped Sentiments (18) Happy Little Stamper- Anything Goes with Dies (1) Happy Little Stamper- CAS (3) Happy Little Stamper- Christmas (4) Happy Little Stamper- Mixed Media (1) Happy Little Stamper- Sketch (1) HLS Christmas Challenge (1) Holly Jolly Christmas (1) House of Cards (49) If You Give a Crafter a Cookie (6) IN(K)SPIRE_me (5) Inkspirational (50) Inspire.Create.Challenge (1) Inspired by All The Little Things (10) Inspired By... (11) Jingle Bells (1) Joy of Sets Tic-Tac-Toe Challenge (1) Just Add Ink (14) Just Us Girls (59) Less is More (23) Let's Squash It! (1) Little Tangles Challenge (4) Make It Monday (2) Make My Monday (61) MarkerPOP! (1) Match this Sketch (1) Merry Monday Challenge Blog (2) MHK Designs (114) Miscellaneous (3) Mix It Up (1) Mod Squad Challenge (12) MoJo Monday (1) My Time to Craft! (6) Naughty or Nice Challenge (3) NBUS (7) One Layer Christmas Card Challenge (2) Paper Craft Crew Challenges (7) Paper Pals Arts (2) Papercraft Challenge (4) Pattie's Creations Design (3) Pause Dream Enjoy Challenges (1) PolkaDoodles Challenge (1) Rainbow Card Challenge (6) Retro Rubber Challenge (21) Retro Sketches (4) Rubber Dance Blog (1) Runway Inspired Challenge (2) Seize the Birthday (9) Sentimental Sundays (1) SheepSki Designs (1) shopping (1) Shopping Our Stash (15) Simon Says Stamp Monday Challenge (5) Simon Says Stamp Wednesday Challenge (6) Simon Says Stamp Work it Wednesday Challenge (1) Sister Act (1) Sketch Saturday (13) Society of Stampholics (3) Sparkle and Shine (3) SSS Wednesday (10) Stampin' Royalty (2) Stamping Sensations (7) StampInkPaper (5) STAMPlorations-Theme & Sketch (3) StampPeddler (26) Sunday Stamps (48) Sweet Stampin (4) Technique Tuesday (1) TGIF Challenges (3) The Card Concept (36) The Challenge (4) The Color Throwdown (120) The Crafty Addicts (1) The Flower Challenge (15) The House That Stamps Built (1) The Library Challenge (4) The Male Room (90) The Merry Christmas Challenge (2) The Paper Craft Crew (1) The Paper Players (121) The Sisterhood of Crafters (2) Tic Tac Toe Challenge (4) Time Out Challenge (26) Try Stamping on Tuesday (2) Tuesday Morning Sketches (1) Tuesday Throwdown (11) tutorial (1) Twofer Challenge (14) Virginia's View Challenge (5) Waffle Flower (1) Watercooler Wednesday Challenge (12) Wednesdays Creative Inspirations (4) Weekly Christmas Challenge (1) Your Next Step (1)