Wednesday, May 13, 2015

The Bold and the Beautiful

Hello Readers,

For today I am sending my card to the TIME OUT Challenge. The colors are so happy and cheery who wouldn't want to create a gleeful card. The bold design and color is what inspired me to create my card.

Entering Challenge:
TIME OUT Challenges #30
 I am very pleased with how this card turned out.. It was very easy so much fun!! Well here it is!!


This bright and cheery card I believe has the perfect sentiment.. What better way to say congratulations then bold bright colors.

So this is how I did it:
  1. Cut and scored my white CS to 4.25” x 5.5” set aside.
  2. Stamped the background on a separate sheet of paper and heat embossed it white.
  3. Colored the waves per the inspiration photo keeping the embossed white lines.
  4. Cut a wave following the embossed line to create two pieces.
  5. The two wavy images were then adhered to the card base making sure to leave lots of white space.
  6. Curved my sentiment stamp to match the curve of the wave and stamped
  7. Added the clear jewels for some sparkle.

That concludes my post. Thank you so much for stopping by today to share some of your busy day with me.. Take care and don’t forget to leave a comment or suggestion.. I would love to hear from you..

All the best,
Shawna 

Tuesday, May 12, 2015

For the birds!

Hello All,

I hope this note finds everyone well.. I am up to my eyeballs in busyness. But I did manage to get this card for you today.  Today I am entering The Male Room: Theme: Birds.  I think I have about a billion bird stamps (I wish I was exaggerating.. ha) so what a perfect challenge to enter then one with a bird theme..
Entering Challenge:
TMR#09-15
 I hope you like it... It was super fun to make but I had to go through a few versions before I got it to my liking..

Note: my laptop just shut down so I doing this from my iPad I will update this link when i am up again.. But just wanted to get this in... Laptop recovered I will edit... but now I have to submit...

While we are on the subject of 'for the birds' I have to tell you this computer is the pinnacle of that statement. It shuts down when it pleases and then it takes its sweet time to reboot and recover. UHHH... It is time for a new computer!! But I am so glad I got this submitted just under the wire (HA! Get it!)

Using sets of three for the panels and chevron stripes.
Lots of color without being too feminine.
Texture stamp added to the black CS.
Very subtle but effective and doesn't fight with the chevron stripes. 

So after this debacle I am now going to tell you how I made this card. It was very easy and took me no time at all..
  1. Cut and scored my CS base to 4.25" x 5.5".
  2. Cut black CS to the same size as the card front.
  3. Stamped the background using VersaMark ink to create a watermark. Secured it to the card base.
  4. Cut out three strips of chevron patterned paper. set aside.
  5. Sponged the sunset/sunrise scene using Distress Ink. First, applying it horizontally then in a circular motion. I find to get a better blend of color that way vs. using the brayer.. I think it turns out well without too many off-colored words. :)
  6. Stamped the birds and sentiment on the scene.
  7. Cut the scenic panel into three sections 
  8. Cut out black border for the scenic panel then added the scene to the border.
  9. Dry fit all the elements on the card. When layout was satisfactory I securely affixed all the pieces down. 
Thank you for your patience while my computer decided to hick-up.  I really hope you liked the post!! I really appreciate you stopping by to see my work. Take care and don't forget to leave comments good, great, or otherwise.

All the best!!
Shawna

Monday, May 11, 2015

At the Bottom of the Sea

Hello Readers,

I have been meaning to submit this card for a long time but well... life happens. No better time then the present!! For today I am submitting this card for Virginia's View Challenge: Theme- Layers.

Entering Challenge:
Virginia's View Challenge #14
Well here is my 'Bottom of the Sea' card!! I hope you like it as much as I liked making it.

The sand dollar gives the card texture as
does the dry embossed sentiment
The sentiment is part of a bigger embossing folder
All I did was tear out the 'thanks'. The tear creates yet another
form of texture.
The playful shells and sea stars contrast beautifully with
the abstract sponged sea horses.
Detailed photo showing the complexity of this card.
However it all works cohesively because of the soft color and
neutral color palette. 
From the soft colors of the background to the sand paper sand dollar (say that three times fast). This card screams dimension and layers yet the soft color palette seems pleasing to the eye as it smoothly moves around the composition. There is a lot going on here, so I added a teal border in the background to anchor your eye which lets everything work together!!

Okay, ready... This is how I did it!

  1. Cut and scored my white CS base to 4.25" x 5.5"
  2. Placed my stencil over the card stock and sponged over it using teal, mauve, and lavender.
  3. Stamped some dark brown shells directly on the CS base.
  4. Added a teal border to anchor all the objects that will be placed on it later.
  5. Stamped the other shells on a separate sheet of paper. Fussy cut then added it to the card. 
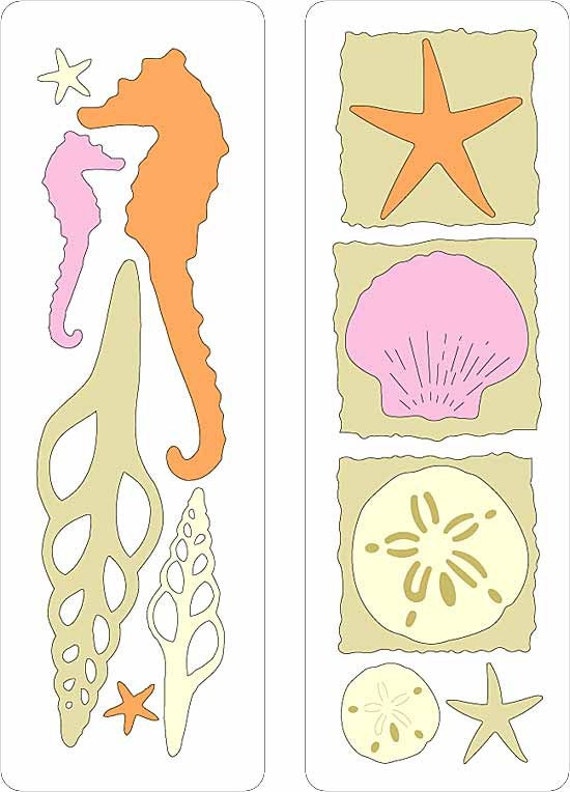
  6. Die cut sea-stars and sea horses (see below) then sponged the edges. added it to the card.
  7. Using a very fine grit sand paper I punched out the sand dollar, then distressed it a brown color. Set aside.
  8. Inked up the embossing folder then dry embossed; transferring the ink onto the paper. 
  9. Carefully tore out the 'Thanks' and added it to the card. 
  10. Wrapped salmon colored twine around the card a few times then tied it in a bow then adhered the sand-dollar.
Die cut by Cuttlebug
Seashells and Seahorses
I actually ended up giving this card away to a friend.. She adores sea horses so I couldn't resist giving it to someone who would enjoy it.. 

A little fact about me, when I was a little girl my sister won some sea horses at the local fair.  She placed them down where I proceeded to gulp them down. Apparently they were very small but it was big enough to give my parents a fright.

Alright it is time for bed but just wanted to share this with you today.. I hope everyone has a great day and thank you so much for stopping by! Don't forget to leave a comment good, great, or otherwise. See you soon!!

All the best,
Shawna

Saturday, May 9, 2015

Wishing...

Hello everyone!
I would like to proudly announce that I won The Male Room Challenge!! What a surprise and what a great Mothers Day gift!! Thank you DT I really do appreciate it..

Now for the card I have been wanting to show you.. It was part of the Society of Stampholics April chain card challenge.. I sent mine to my new friend Carol in Scotland.  And again, like last month, I was kind of intimated sending a card to such a talented artist. You can hop on over to her blog to see her amazing work..

2015-04


2015-04
Here was the sketch and color inspiration
from S.O.S April Challenge
And here is what I came up with.. NOTHING like I imaged! I wanted to use the color palette but it just didn't work out that way.. However, I do love the way it turned out.

Without further ado here is my design:

Well at least the sketch was in line with
my design.
Stamped and splattered color to create a
kind of space look. hummm..
The three sequins and three stars create
a triangle which is pleasing to the eye.
I used a h2o-color wash, then stamped, then washed again, used acrylic paint with water, used just acrylic paint.. AHH!! not working out!! Then I set it aside and ate dinner... Came back and thought 'This actually isn't too bad. In fact, it goes with my star theme and there it was in front of me the entire time.. 

So this is how did it:
  1. Cut and scored my CS to 4.25" x 5.5"
  2. Cut heavy watercolor paper to 1/4" smaller then the card base.
  3. Then washed, stamped, painted with water, painted without water.. Left and came back and loved it.
  4. Die cut a star out of the watercolor paper exposing the white card base underneath.
  5. Die cut two smaller stars and traced them with a black marker. Adhered them to the card.
  6. Added the sequins
  7. Stamped sentiment on the exposed white CS base.
That was it.. I really hope you enjoyed your time with me today.. Thank you so much for stopping by and don't forget to leave a comment good, great, or otherwise.. Take care all and hope you have a great day!!

All the best,
Shawna 

Tuesday, May 5, 2015

Seeds of Kindness

Hello Readers!!

Today I am entering the Fusion Challenge with lots of flowers and glorious color!! Just like the inspiration photo...

Entering Fusion Challenge
Happy Days

This challenge inspired me from day one... I have had this idea since this inspiration came out... I should have just done it but there are only 24 hours in a day... Well here is my card and really hope you like it...

Lots of color and depth

Perfect sentiment for the card and the sponged edges
give it that elegance it needs.
Printing seed packets saved a ton of time..
Card Size: 4.25 x 5.5

Showing all the glorious dimension!!


The color, texture of the inspiration photo, and the layout of the sketch was the perfect storm for me… What a lovely card to promote ‘Happy Days’..

So this is how I did it.
  1. Cut and scored my card base to 4.25” 5.5”
  2. Cut background paper then dry embossed the paper with an inked up embossing folder.
  3. Stamped the wood texture on a plain piece of scrap.
  4. Cut out printed images of seed packets then adhered it to the base.
  5. Taped down the wood texture panel to the card.
  6. Stamped the images from the soon to be retired set from Stampin Up? Colored them, did a bit of fussy cutting and attached all that to the card.
  7. Stamped the sentiment, die cut into a shape, and then sponged lightly around the edges with the die still on

Well that is it for me I hope you a very good night and I want to thank you so much for stopping by..

All the Best,
Shawna 

Sunday, May 3, 2015

Greeting Earthling!

Greetings Everyone,

Inkspirational is the challenge I am entering today.  I must admit I am a self professed space geek! I am so intrigued on all we found out and all the mysteries the universe still has for us to uncover. Fascinating!! Okay, back to the challenge.

Entering Challenge:
Inkspirational #81

This card has a ton of white space around... well... space... But I just couldn't help putting a border around the card... I think it visually anchors the image. Well enough talk here is the card for today...

A lot of space around... well... SPACE.
Cut out the image and attached it to my printed
CS with two brads. leaving the bottom of the image
to 'float' off the card. 
Added just a bit of sparkle
with only 3 sequins
 I have just been dying to using this stamp by Unity..  Here in town we have a craft outlet store which sells one-offs and damaged goods but mostly it is just the packaging that is ruined.. So with that you get AMAZING deals on great stuff... The best part, it is only a 3-5 minute drive from my house!  Anyhoo, that is where I got this stamp.. I just fell in love with it and now this is the perfect opportunity to use my NBUS!!

So this is how I did it:

  1. Cut and scored my card base to A2: 4.25" x 5.5".
  2. Cut Midnight Blue CS to match the A2 size. Adhered it the base.
  3. Created and printed out the sentiment.
  4. Cut the sentiment CS to 1/8" smaller on each side. 
  5. Stamped image, colored, and fussy cut.
  6. Attached the space image to the sentiment CS using two brads then adhered the entire thing to the blue base.. 
  7. Added some sequins for some starry sparkle.
That is it for now... Thank you so much for stopping by and spending time with me.  Don't forget to leave a comment good, great or otherwise. Take care and have a great day.

All the Best,
Shawna 

Wednesday, April 29, 2015

New recruit

Hello Everyone,

You may have noticed I deleted my last post. Why? I just didn't like it for the challenge and have decided to submit another card. But that is not what this post is about. My nephew has just enlisted in the Army and I couldn't be prouder. I remember when he was just a bustling little boy. Wow how time flies!! I usually send this out to my family but for now it is just between you, me, and the World Wide Web..

Also I have decided to join the CAS(E) this Sketch challenge this week.  Like I have been saying all along I am working on my CAS skills and I think this time I did pretty well.  I do have good incentive...

Entering Challenge:
CTS #120
Well here goes nothing!! Here is my interpretation of the sketch.. I hope you like it as much as I liked making it.

Shapes and colors of the background
give the impression of a flag. Bold colors and
sentiment seem to work cohesively together.
The splatters and grid pattern is what
really gives this card a masculine look.
Card Size: A2
Close up of the image I created. Eagle was lightly colored
I wanted the eye to ask 'Is that bird colored?' Only the beak
and feet really give the answer 'yes'
Okay so this is how I did it:
  1. Cut and scored my card to A2 size: 4.25” x 5.5” to make a top folding card.
  2. Stamped the eagle on scratch paper then on my card.
  3. Created an eagle mask and applied it to the card
  4. Masked off an area for the stripes then stamped the image.
  5. Stamped the stars using VersaMark Ink and heat embossed in white.
  6. Sponged the blue using Distress Ink (Faded Jeans)
  7. Stamped the grid (retired SU) and splotches
  8. Stamped the sentiment 2x for a bolder look.
  9. Took off eagle mask and ever so slightly colored the eagle. 
Well that is it! Clean and Simple.. I think my nephew will like this card. It feels good to know that he is appreciated for what he is doing for our country. Thank you Michael.. You are truly my hero.
Take care all and thank you so much for visiting!! I do really appreciate your comments if you feel so inclined… See you soon.

All the best,
Shawna 
Related Posts Plugin for WordPress, Blogger...

Labels

(PIN)spirational (76) 4 Crafty Chicks (1) A Day For Daisies (3) AAA Birthday (6) AAA Cards (50) AAA Colourful (1) ABC Christmas Challenge (1) Addicted to CAS (41) Addicted to Stamps (2) Addicted to Stamps and More (31) All Dressed Up Challenge (1) Allsorts Challenge (4) Alphabet Challenge (2) Always Playing with Paper (11) Animal Friends Challenge (3) As You See It (12) Brown Sugar Challenge (12) CanYouCaseIt Challenge (1) Cards in Envy (21) Cardz4Galz (2) Cardz4Guys (12) CAS Colours & Sketches (26) CAS Mix Up (1) CAS on Fridays (8) CAS on Sunday (5) CAS Stencil Challenge (1) CAS Watercolour Card Challenge (12) CAS-ology (54) CAS-ual Fridays (4) CAS(E) this Sketch (90) CASEing Christmas (1) casology (1) Challenge Up Your Life (6) Christmas Card Challenge Blog (2) Christmas Card Throwdown (1) City Crafter Challenge Blog (37) Color Hues (8) Color INKspiration (2) Color My Heart Color Dare (42) Colour Q (26) Come and Get It Challenge (3) Craft Stamper Challenge (2) Crafty Cardmakers (2) Crafty Creations (1) Crafty Gals Corner (10) Crafty Hazelnut's Christmas Challenge (1) Create with Connie and Mary (8) Creative Inspirations (2) Creative Knockouts (5) Creative with Stamps (46) Cupcake Inspirations (28) Curtain Call (18) Daisy Chain Challenges (2) Daring Cardmakers (2) Day of the Month Card Club (4) Design Team (294) Double D Challenges (42) DRS Designs (4) Fab Friday (5) Fab n' Funky (2) Fantasy Stampers (1) Festive Friday (3) Freshly Made Sketches (125) Friday MashUp! (3) Fusion (33) Gina K. Designs (1) Global Design Project (3) Guest Designer (42) Hand Stamped Sentiments (18) Happy Little Stamper- Anything Goes with Dies (1) Happy Little Stamper- CAS (3) Happy Little Stamper- Christmas (4) Happy Little Stamper- Mixed Media (1) Happy Little Stamper- Sketch (1) HLS Christmas Challenge (1) Holly Jolly Christmas (1) House of Cards (49) If You Give a Crafter a Cookie (6) IN(K)SPIRE_me (5) Inkspirational (50) Inspire.Create.Challenge (1) Inspired by All The Little Things (10) Inspired By... (11) Jingle Bells (1) Joy of Sets Tic-Tac-Toe Challenge (1) Just Add Ink (14) Just Us Girls (59) Less is More (23) Let's Squash It! (1) Little Tangles Challenge (4) Make It Monday (2) Make My Monday (61) MarkerPOP! (1) Match this Sketch (1) Merry Monday Challenge Blog (2) MHK Designs (114) Miscellaneous (3) Mix It Up (1) Mod Squad Challenge (12) MoJo Monday (1) My Time to Craft! (6) Naughty or Nice Challenge (3) NBUS (7) One Layer Christmas Card Challenge (2) Paper Craft Crew Challenges (7) Paper Pals Arts (2) Papercraft Challenge (4) Pattie's Creations Design (3) Pause Dream Enjoy Challenges (1) PolkaDoodles Challenge (1) Rainbow Card Challenge (6) Retro Rubber Challenge (21) Retro Sketches (4) Rubber Dance Blog (1) Runway Inspired Challenge (2) Seize the Birthday (9) Sentimental Sundays (1) SheepSki Designs (1) shopping (1) Shopping Our Stash (15) Simon Says Stamp Monday Challenge (5) Simon Says Stamp Wednesday Challenge (6) Simon Says Stamp Work it Wednesday Challenge (1) Sister Act (1) Sketch Saturday (13) Society of Stampholics (3) Sparkle and Shine (3) SSS Wednesday (10) Stampin' Royalty (2) Stamping Sensations (7) StampInkPaper (5) STAMPlorations-Theme & Sketch (3) StampPeddler (26) Sunday Stamps (48) Sweet Stampin (4) Technique Tuesday (1) TGIF Challenges (3) The Card Concept (36) The Challenge (4) The Color Throwdown (120) The Crafty Addicts (1) The Flower Challenge (15) The House That Stamps Built (1) The Library Challenge (4) The Male Room (90) The Merry Christmas Challenge (2) The Paper Craft Crew (1) The Paper Players (121) The Sisterhood of Crafters (2) Tic Tac Toe Challenge (4) Time Out Challenge (26) Try Stamping on Tuesday (2) Tuesday Morning Sketches (1) Tuesday Throwdown (11) tutorial (1) Twofer Challenge (14) Virginia's View Challenge (5) Waffle Flower (1) Watercooler Wednesday Challenge (12) Wednesdays Creative Inspirations (4) Weekly Christmas Challenge (1) Your Next Step (1)